

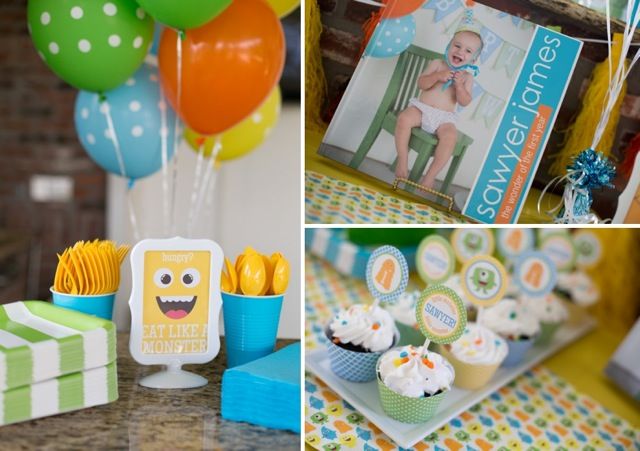
We love seeing how our items get used--so often we fill orders and hope that people are able to print and assemble, but we never know for sure. It's SO delightful to see the decorations in action--especially when they knock it out of the park like this! The monster theme continues to be one of our best sellers--especially in September and October! I think it's such a sweet theme for a first birthday because those babies really can be the sweetest little monsters.
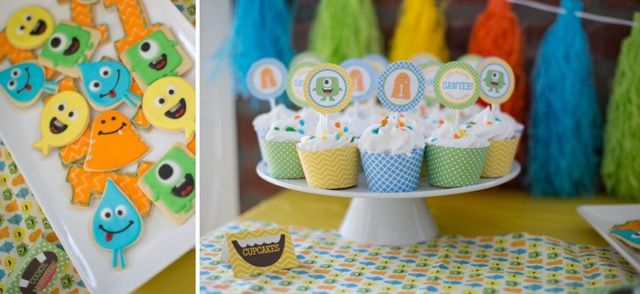
I'm obsessed with the sugar cookies Jamie had for the party--they are such an amazing match to the monsters used throughout the printables and are such a bright, cheerful addition to the dessert table.

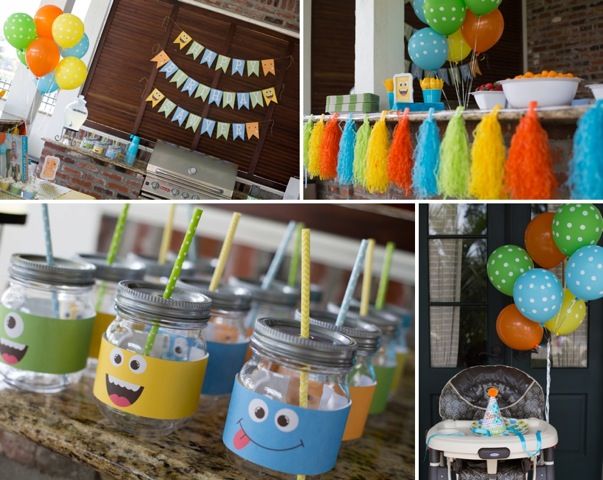
The tissue paper tassels are from Party City (although Jamie had to tear off the pink ones!) I love when you can find party store decor that fits so well.
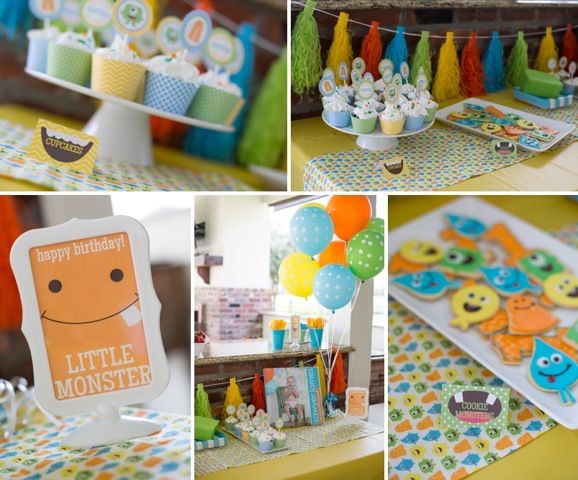
Water bottle labels are some of our most versatile items. They fit water bottles, mason jars... and can be used as a wrapper for napkins! I love these guys silly faces.
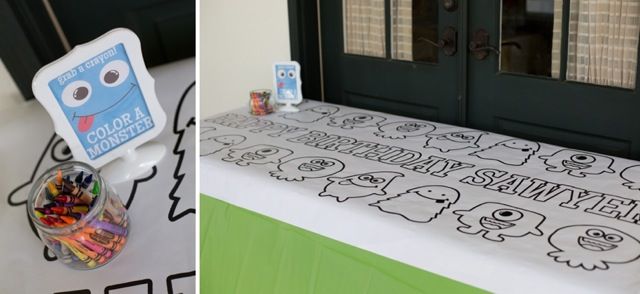
Coloring walls are always a hit--and when you don't have a wall that works, using it as a tablecloth is just as fun.
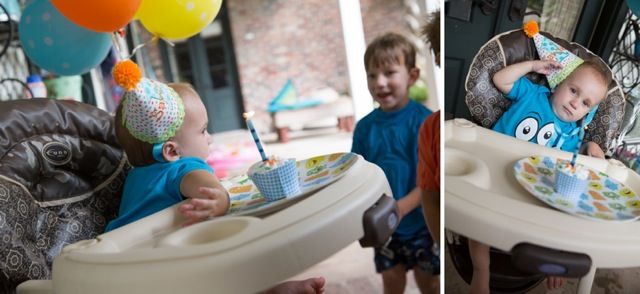
Sawyer ate his birthday cupcake off our matching melamine plate. It's so fun to get a matching plate for parties--we have a stack in our cabinet that help us remember how quickly the years are flying by!
Thanks so much to Jamie for sharing her AMAZING pictures. She did such an outstanding job putting the party together. All monster items are available in our Etsy shop here.
Sawyer's Little Monster Party
Our First Expo
The R portion (that's me! Rachel!) of RV Parties has recently relocated to Beaumont, TX. I'm diving into the world of planning parties for people other than my own kids--and to kick things off, I put together a booth at the local Baby and Family Expo to meet some potential clients.
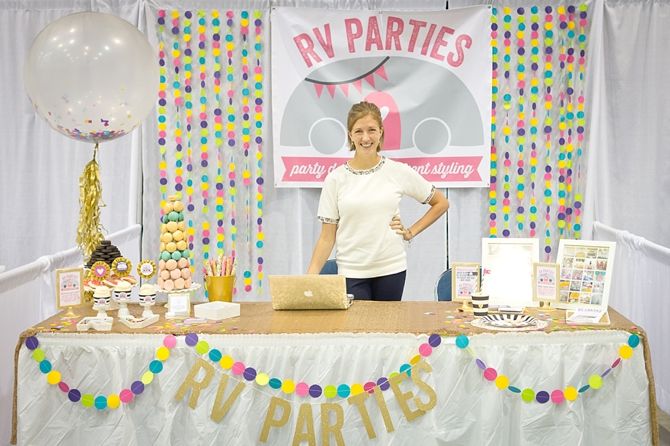
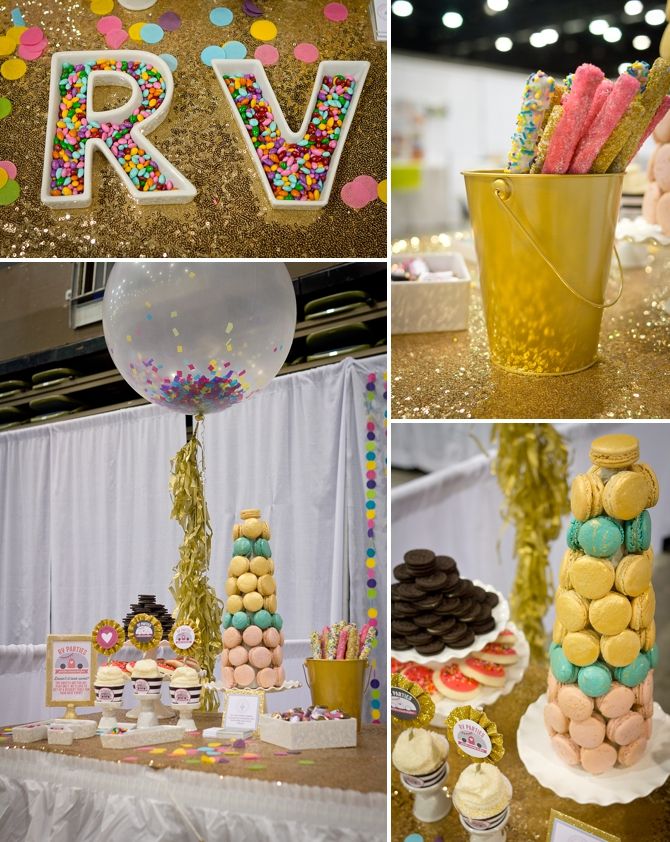
You may recognize... just about everything from Victoria's bridal shower from the previous weekend! Two birds, one stone. I'm all about efficiency! You would not believe how much of that circle garland did NOT get used... I sewed probably a mile of it. I was thrilled that I was able to untie the jumbo balloon and refill it for another event! I just love the huge balloons.
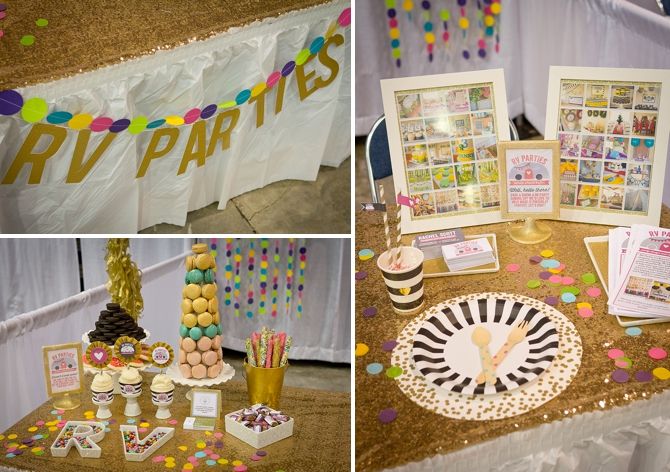
I set up two sections on my table--a mini sweets table and an informational section. I tried to put out eye catching things that are unique--the macaron tree, the letter candy dishes, gold cupcake toppers... I had two frames filled with photos from past events, as well as business cards and brochures for people to grab. I gave out almost 100 brochures--and a few people seemed genuinely interested!
When RV Parties was strictly Etsy based we never had any confusion about the name. I was SHOCKED how many people asked me what kind of RV we had or how the RV worked... and I had to explain that it's just our initials! After being asked about it so many times, I started to think that I actually do want an RV that can be a mobile party headquarters. I mean, it's actually a pretty good idea! Maybe in a few years. :)


New Look!
We're slowly updating all parts of the biz--we rebranded a few months ago and are thrilled with the new look of the blog. Poke around a little bit and see what's new!
RV Photoshoot
We were lucky to snag some time with our favorite KC photographer (Erica of Anecdotally Yours) a few weeks ago when we were both in Kansas. We had some grand plans for some pink balloons to match our logo... but failed to check the weather before we left the house. It was WIN-DY and we lost about half the balloons by the time we got to the shoot.

We love to plan parties together (obviously!) and had such a great time spending the week planning the ultimate party--Victoria's wedding! Not to me--to Kip.
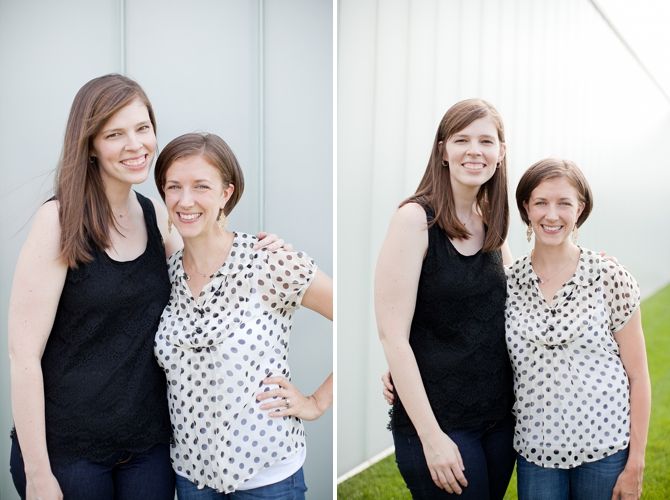
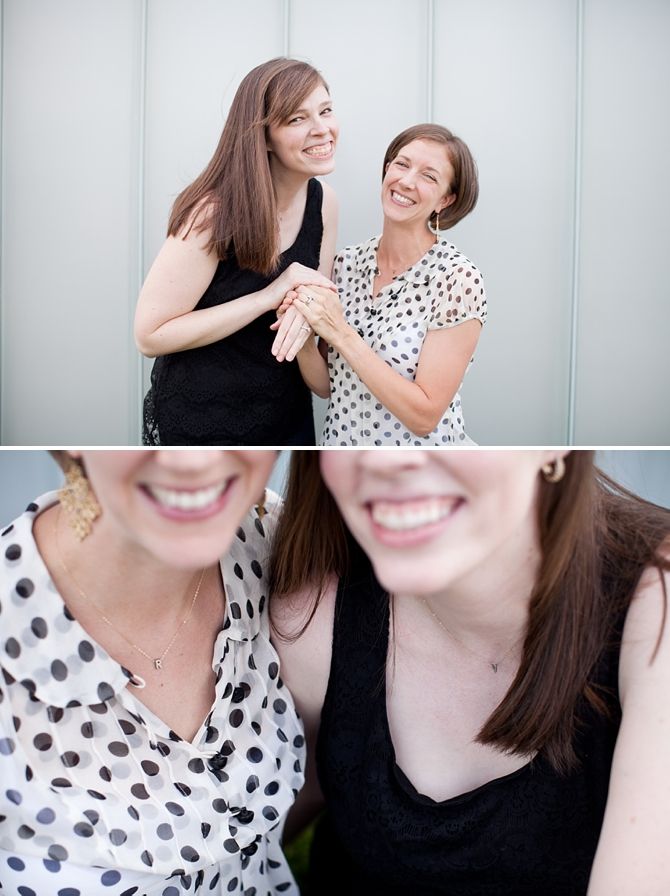
Victoria was having engagement pictures taken later in the week, so I made her practice taking a ring picture with me. Sometimes I think I'm probably lucky that I have any friends at all. Erica also humored us by trying to get a picture of our matching R and V necklaces...
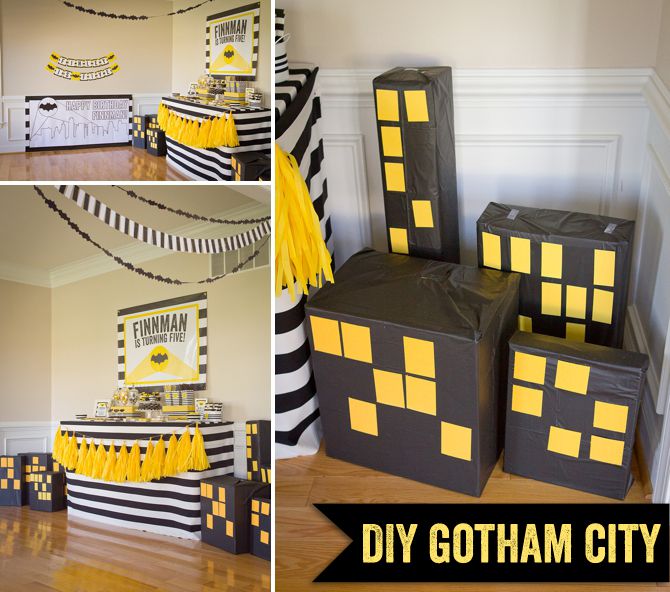
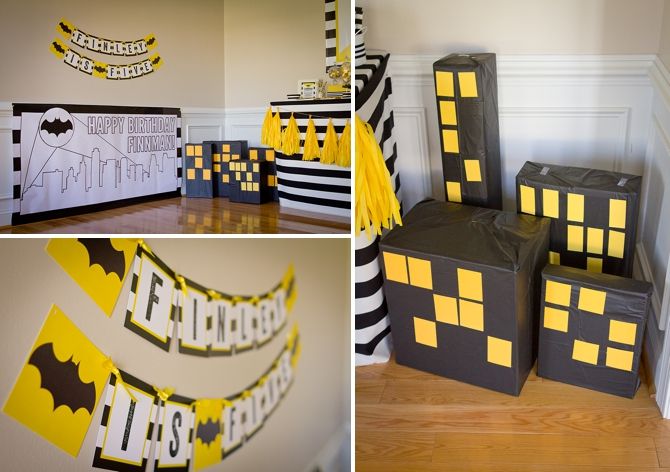
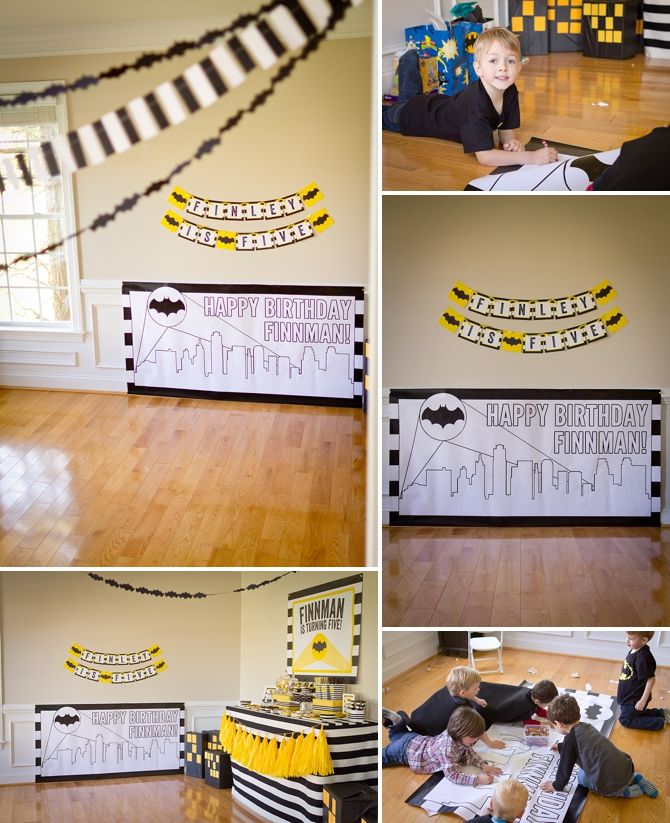
Budget DIY Gotham City -- for less than $5!
No Batman Party is complete without your very own Gotham City to save! This was a cheap and easy addition to the party and really helped make the dessert table pop!
To make your skyline you need...
--boxes
--black plastic table cloths
--tape
--scissors
--yellow paper
We're Amazon enthusiasts, so it didn't take more than a few weeks to have enough boxes to use for this. This was a CHEAP project--I used two black table cloths and about 5 sheets of yellow paper bringing my total in at under $5!
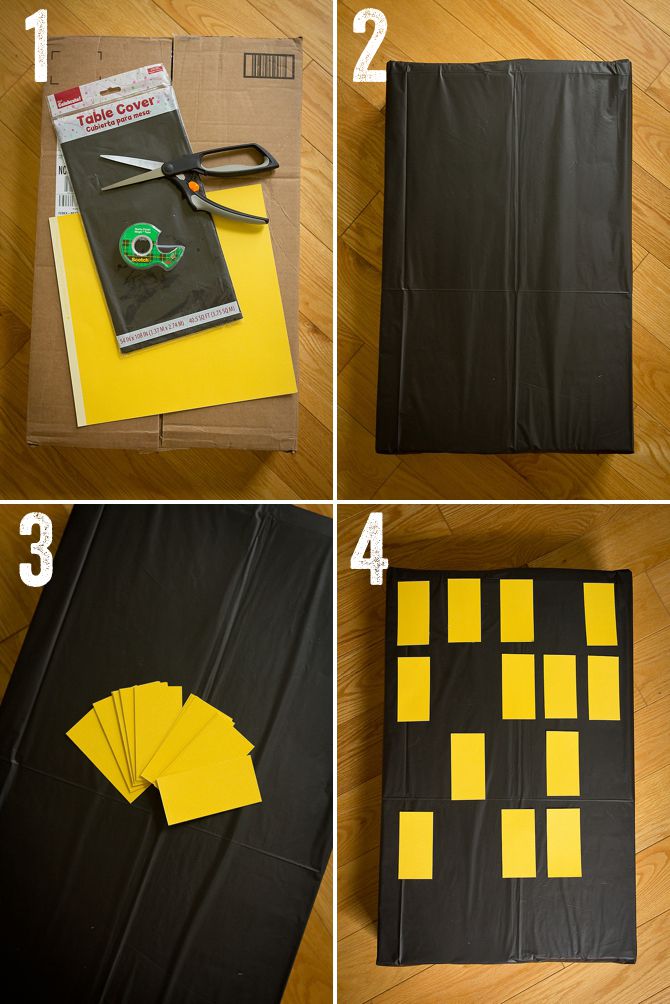
Here are the quick steps:
1. Gather your supplies.
2. Cut a rectangle of table cloth and wrap a box--present style.
3. Cut out a variety of yellow rectangles.
4. Tape them on in a random grid fashion.
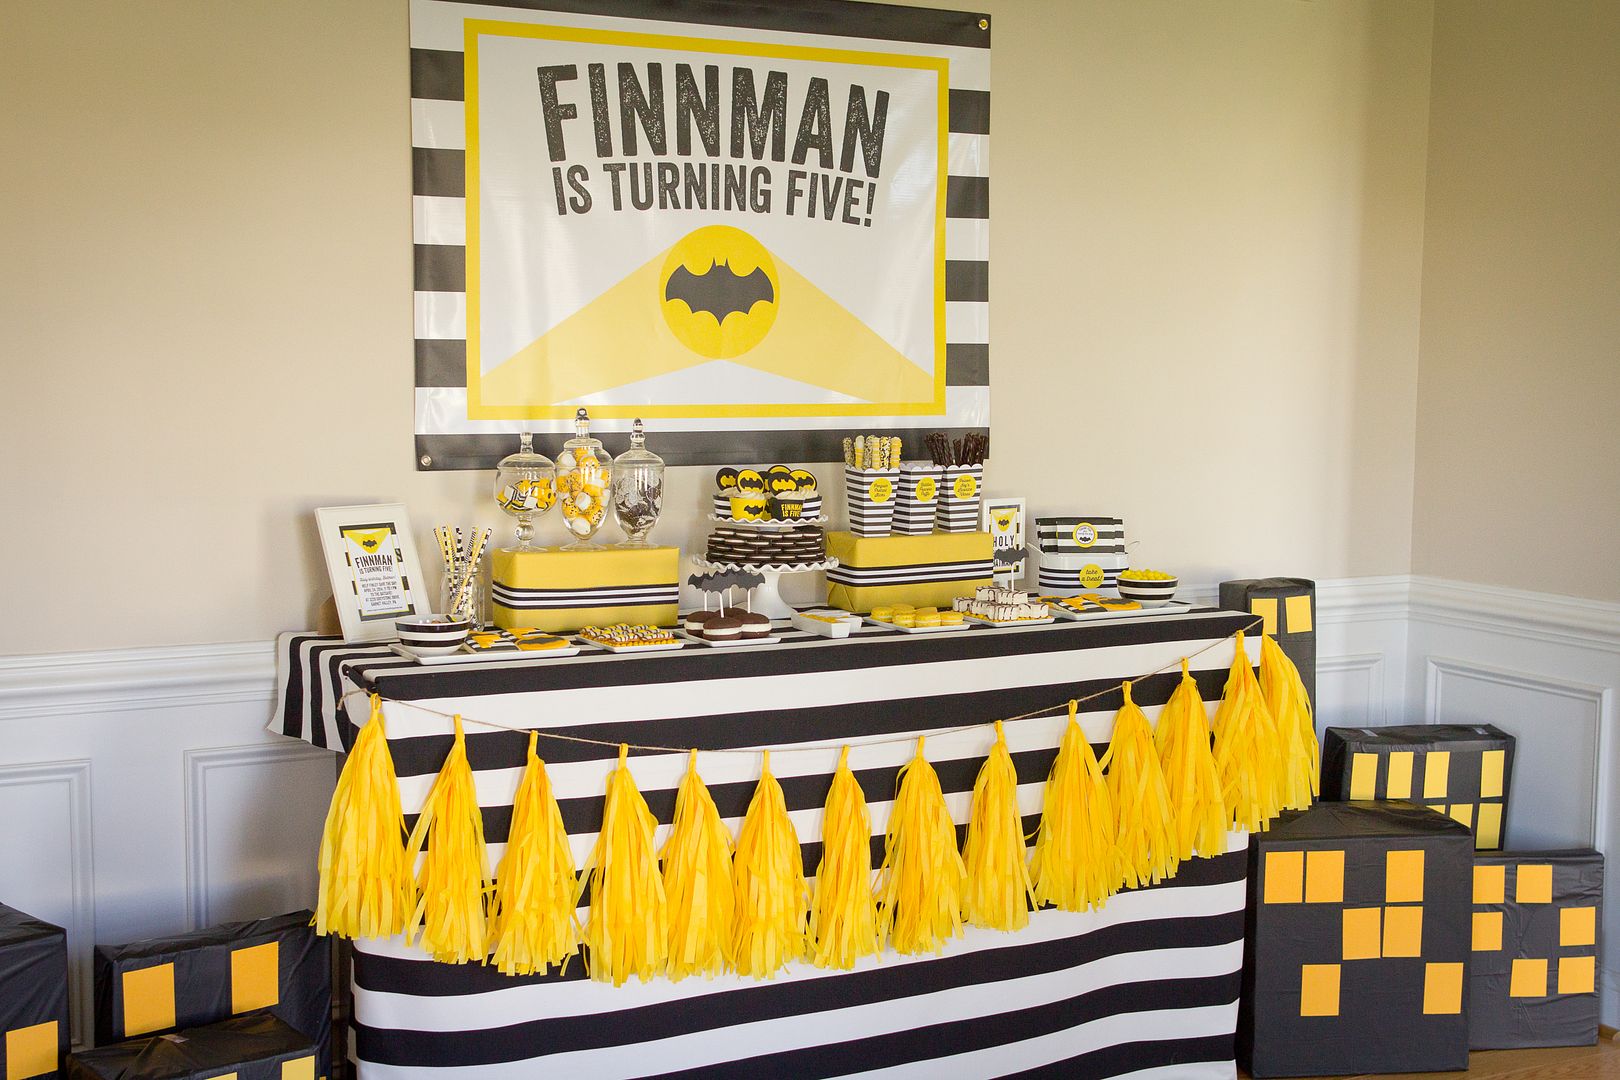
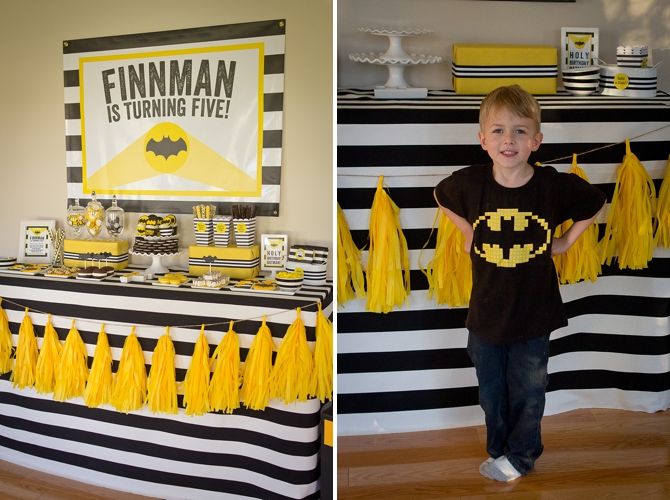
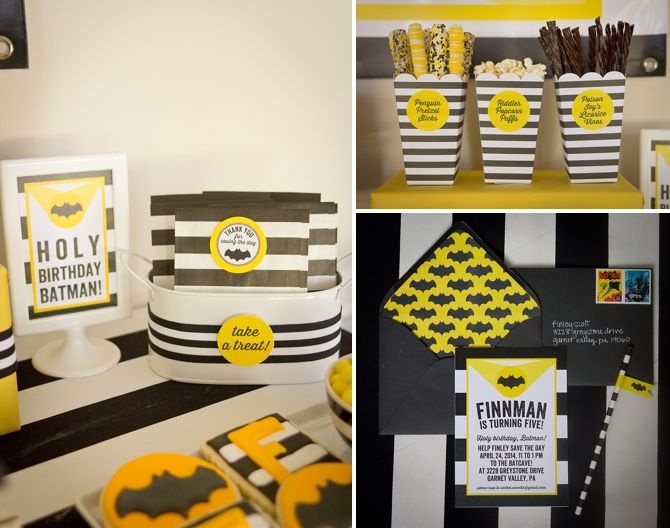
Real Party Feature: A Modern Black and White Batman Party
Ready for an adorable Batman party? Good because you are about to get a million pictures of one! My oldest son loves Batman--and even though I probably could have talked him into a few other themes, I couldn't resist throwing him a party I knew he'd LOVE. (I forgot to get a good picture of him until after we dismantled the dessert table. Whoops!)
Finley and his brother are both April babies--so I reused a ton of decorations from Braden's train party. Like, as much as I possibly could. :) I started hoarding black and white objects months before and tried get creative with foods so I wouldn't have too much prep to do!
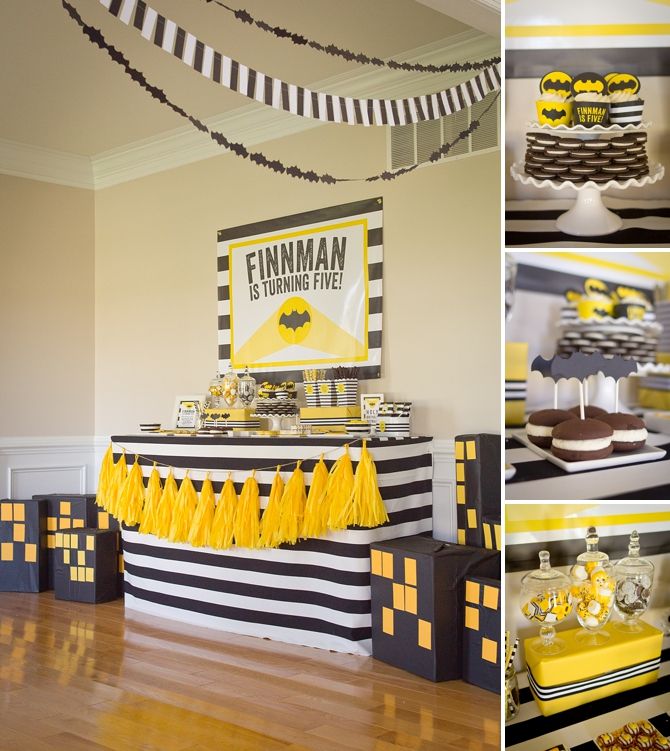
The Gotham City Skyline was so fun and easy to put together--not to mention cheap! The tutorial for how to put it together will be live HERE later this week! I love how nicely it framed the table and naturally tied in to our color scheme.
We had so many fabulous sweets! I tried my best to find store bought treats or make easy things so that I wouldn't spend too much time baking. I loved the oreo tower under the cupcakes--Trader Joes makes a great cupcake that looks adorable in our cupcake wrappers! Zebra cakes, whoopie pies, chocolate Twizzlers, yellow M&Ms, Lemonheads and popcorn were a few of the treats that I was able to purchase and not make myself!
I love dipping pretzels in chocolate--kids LOVE them and they are pretty hard to mess up. I don't ever want to attempt another cake ball--I always mess them up. But I'm pretty good at dipping pretzels! I think wrapping mini-chocolates in our wrappers is super fun too! And no party is complete without Victoria's sugar cookies! Could they match any more perfectly or be any cuter? Love.
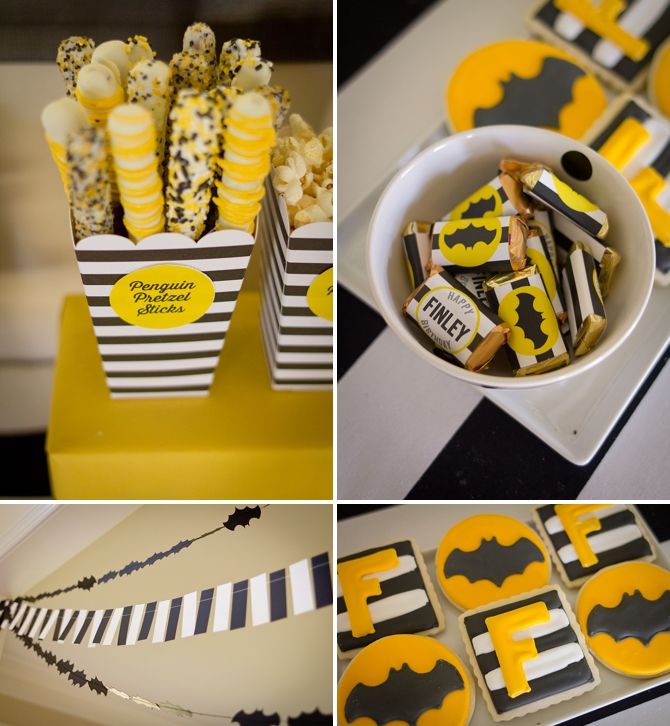
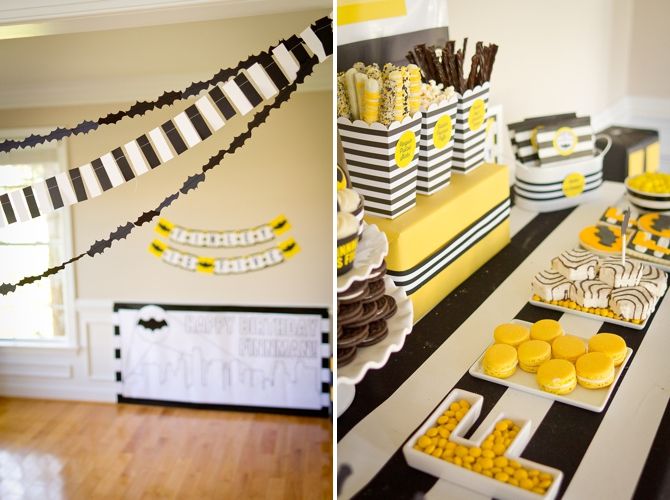
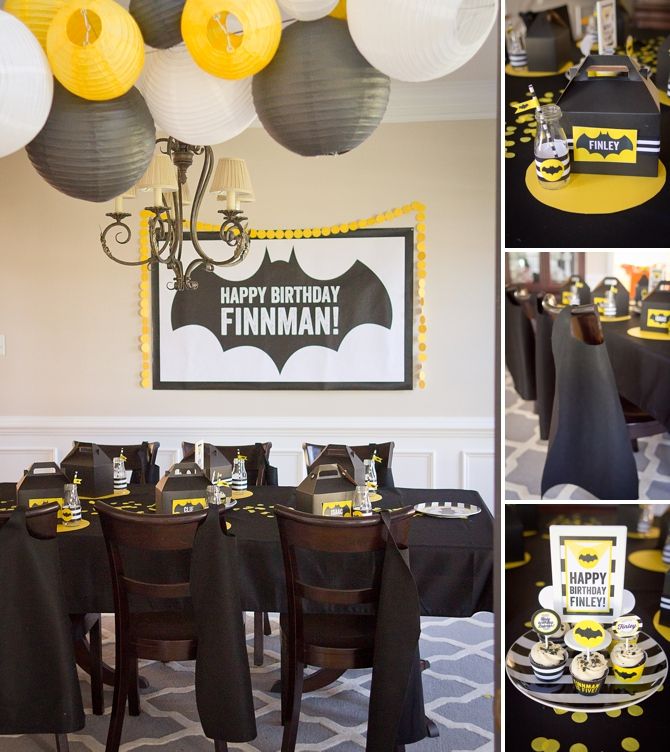
I am not sure I can throw a party without paper garland--I'm just too obsessed with how it looks! The bats were cut out on my Silhouette and I chopped up black and white paper to make the striped garland. I can't stop with the paper garlands.

The kids took home a Batman coloring book, cape and a few Batman trinkets I picked up around town. I loved the way the invites came together--I am not sure I'll be able to send another invite without lining the envelope first! I found some superhero stamps on eBay and loved the way they looked on the black envelopes!
Coloring walls are always a hit with the preschool crowd--they had a blast coloring in and adding their own superheroes to the skyline! They ended up coloring on the floor since the trim on the walls made it too bumpy. Not only are they fun--they are inexpensive too! My local printer prints them for $.75 per square foot.
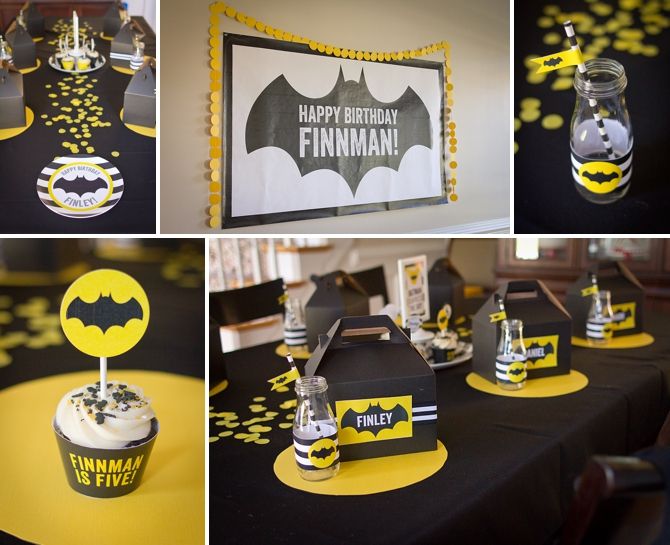
I love making dessert tables--but I also love carrying the theme through to the eating area! The paper lantern garland bridged the two rooms and helped to tie them together. After settling on black and white as the main colors--I realized I could make more engineer prints for the walls! The big Finnman print was a few dollars and served as a great backdrop to the table. I bought a few yards of black felt and threw together some capes fairly quickly. They looked cute on the chair backs and the kids loved running around in them!
I love so much about this table--I love the confetti table runner, the yellow circle placemats and gable boxes. It all came together so nicely! The gable boxes were great for pre-packaging the kids meals--and after the meals were over I filled their boxes with treats from the dessert table--a great way for them to take home sweets for their parents to dole out, rather than being on a huge sugar high!
So that's the Batman party! It was a fun one--mostly because my five year old LOVED it!
Friday Finds: A Coffee Bar Party.
 Sometimes when we are scrolling through Pinterest, we find a broken pin. It doesn't link to the source and a google image search doesn't help us either! For this week's Friday Find, we started with a broken pin and put our own spin on it. We assume that the photo was a staged shot from a fancy home remodel, but we also think it could be the backdrop for a fabulous brunch at home with good friends! Here's what we would need.
1. The ever classic monogram mug from Anthropologie would be perfect for you and your guests, not to mention the sweetest of party favors. (We've also seen them crafted into hostess gifts planted by our pal, Laura. These mugs can do anything!)
2. We love this tutorial on coffee mixing spoons. She made hers with instant coffee mixed into the mix - just add milk! You could also just dip vintage spoons in assorted chocolates, drizzle on top, and line them up on the coffee bar for easy use and pretty accessories. Coffee and chocolate just go together.
3. If you're hosting a coffee bar brunch, then you probably embrace this life motto. You can grab the button from our favorite shop selling custom pencils on Etsy, the Carbon Crusader. Maybe guests need a matching pencil and a coffee to-do lists printable to take home too. They'll probably have tons of good ideas after all that coffee!
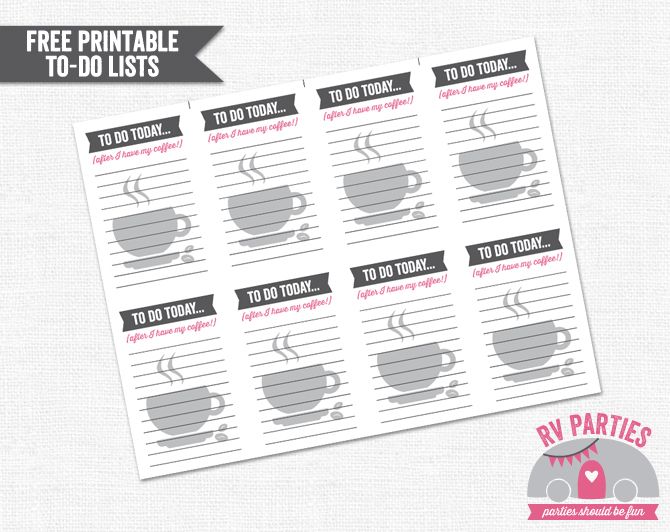
Make sure to download your free printable to-do list here. One sheet will get you through the week (with a little help from the coffee!). Thanks for reading the RV Parties blog!


SHARE »